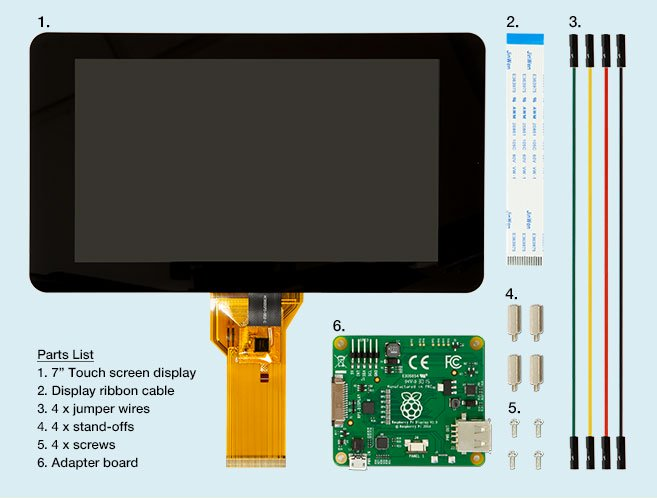
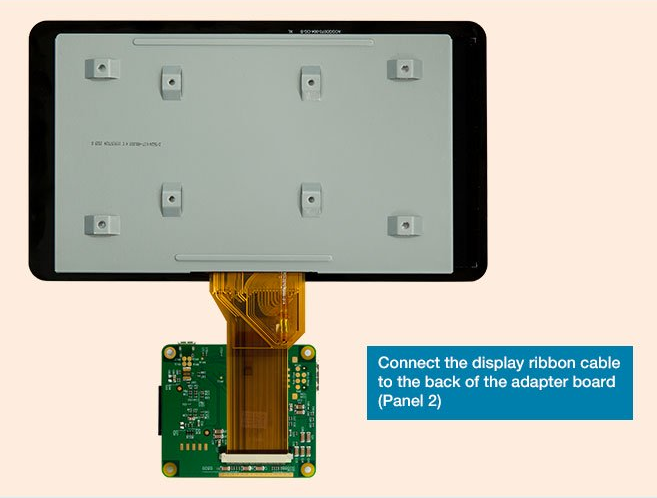


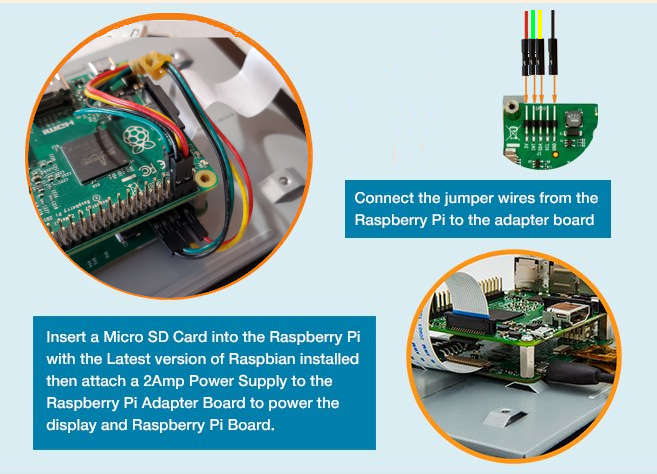


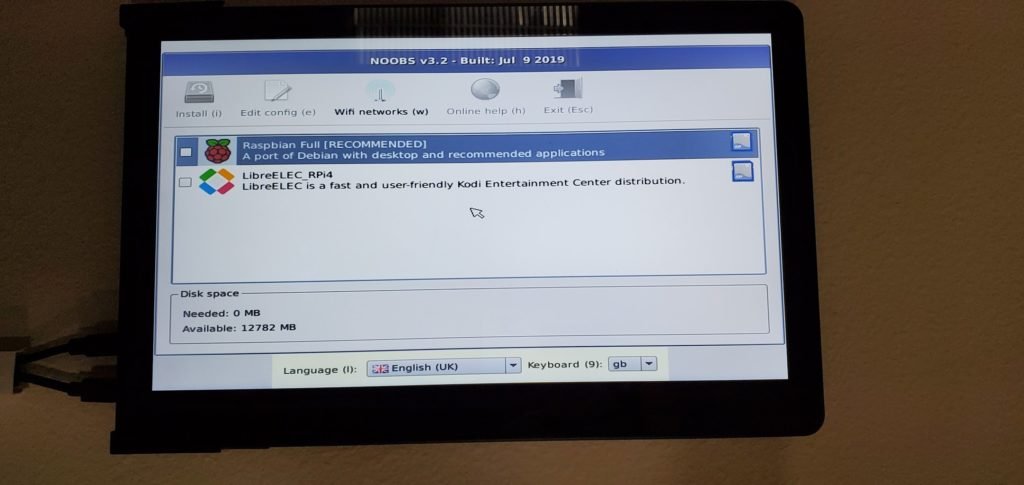
The touch panel will not work properly until we set it up later, so the Keyboard and Mouse are required until then.


This step should happen right after the previous one. If not, click on the network icon in the top right and connect.


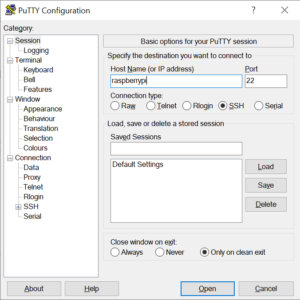
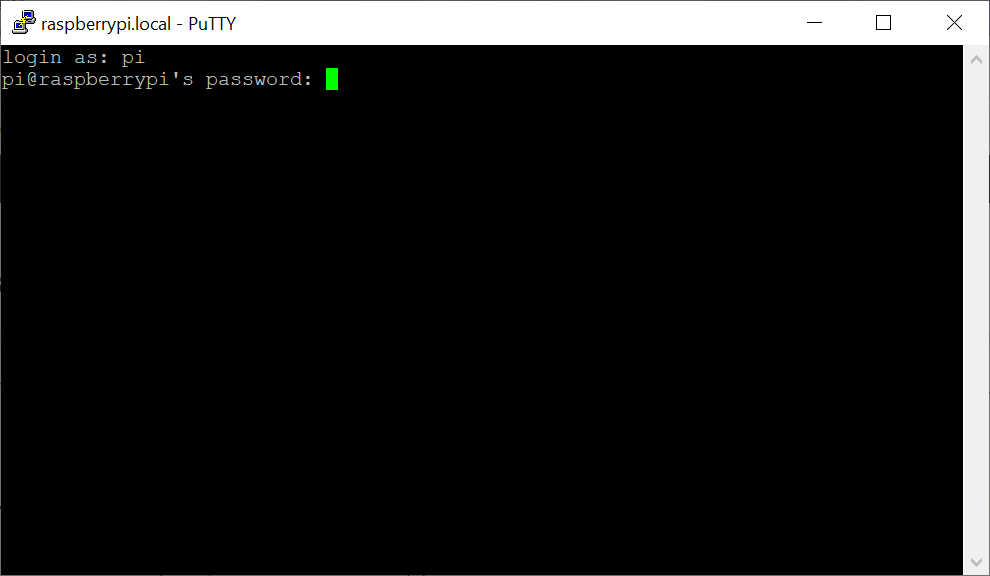
The recommend application is PuTTY (link). Not sure which one to download, Version 0.73 MSI installer is likely your safest bet. Direct Link to that is here.
I have also used Termius on my iPad
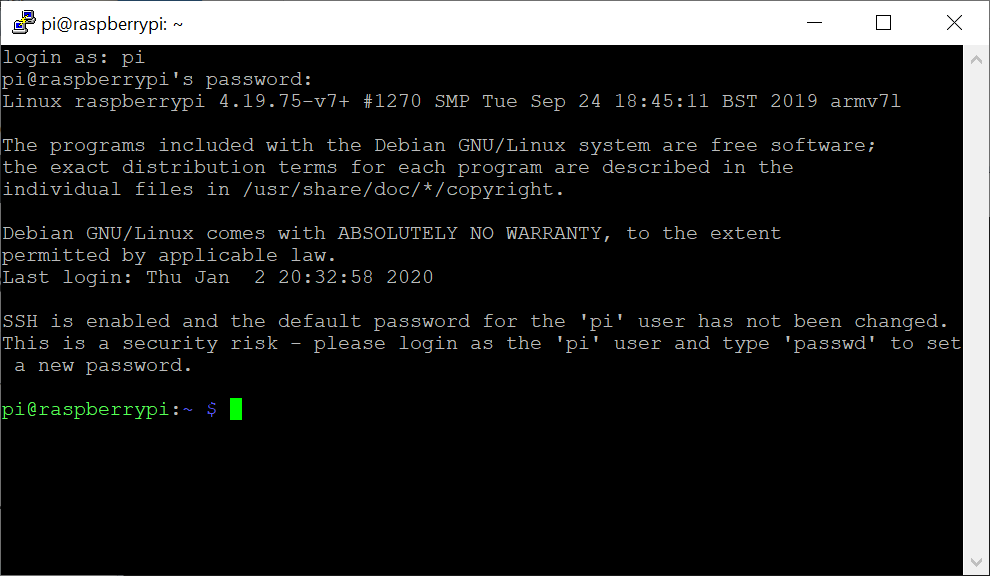
Enter username and password from earlier.
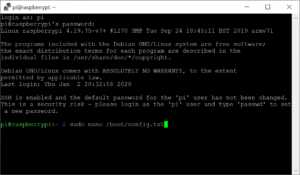
Start by opening the boot config file:
sudo nano /boot/config.txt
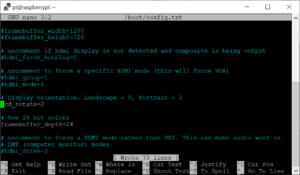
In this config file, add the following lines of text:
# Display orientation. Landscape = 0, Portrait = 1
lcd_rotate=2

# Use 24 bit colors
framebuffer_depth=24
Hit ctrl+o to save the file
Hit ctrl+x to exit the file
Reboot your Pi by inputting:
sudo rebootand hitting enter. Your connection should disconnect.
Home Assistant takes multiple steps to install in this environment. You may need to confirm a few settings as it runs, but for the most part each command simply requires you to hit enter to execute
sudo apt-get install software-properties-common
sudo apt-get update
sudo apt-get install -y apparmor-utils apt-transport-https avahi-daemon ca-certificates curl dbus jq network-manager socat
systemctl disable ModemManager
curl -fsSL get.docker.com | sh
curl -sL "https://raw.githubusercontent.com/home-assistant/supervised-installer/master/installer.sh" | bash -s -- -m raspberrypi3
Home Assistant is now official set up on your Raspberry Pi!
From a web browser, navigate to:
http://raspberrypi:8123
If the connection is getting refused, this is because Hass.io and Raspbian have each set up their own IP address, but kept the same hostname. Return to your router settings and you will see two RASPBERRYPI’s connected. Try both of these IP addresses in your browser until one connects to Home Assistant.
The initial setup takes about 10-20 minutes so you may just have to watch it update:
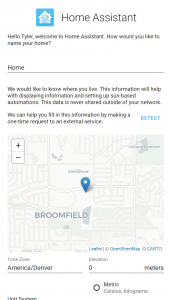
Once setup, you will see a screen asking for you to setup a new user for home assistant. This is a different account from your Raspberry Pi but you can keep it the same for ease of use.

Once you have created your account, you will be asked for your location, which you can update by detecting your location then dragging the pin.
I also used WhatIsMyElevation.com to determine my elevation for Sun Up/ Sun Down automation. Enter these numbers and hit NEXT
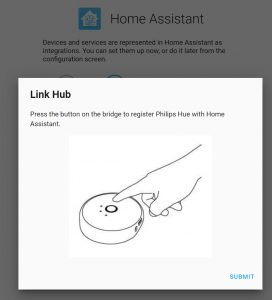
The next screen will ask if you want to add any additional devices. If you are using the Phillips Hue or WeMo devices as I mentioned earlier, these should show up automatically here. Click and follow their instructions to configure.
Now we’re going to install some crucial components to get our touch panel running.
Start by clicking on Hass.io on the left hand side
Then navigate to the Add-On Store

And we are going to install:
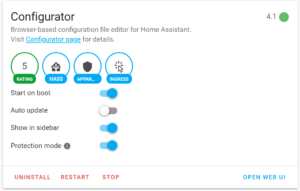
Configurator
This will allow us to edit our config files from within our Home Assistant portal.
After Configurator is installed, ensure “Start on boot” and “Show in sidebar” are turned on, and hit Start.
You now have a fully functional Home Assistant hub. You are free to do and configure as you please. The following steps will help you to start with lights and switches, but keep an eye out for better documentation on how to get started.
By default, Home Assistant has a built in web server. To utilize it, you simply need to create a folder for the directory. To do this:
Connect to your Pi via SSH
Navigate to the root directory
cd /
Navigate to the Home Assistant directory
cd usr/share/hassio/homeassistant
Create a new directory ‘www’
sudo mkdir wwwOpen up new directory by navigating to it like before
cd wwwClone directory (https://github.com/resoai/TileBoard)
sudo git clone https://github.com/resoai/TileBoard tileboardNavigate to new tileboard directory
cd tileboardDuplicate and rename example config
sudo cp config.example.js config.jsReboot raspberry pi to initiate new web server
sudo reboot
Now that we have Tileboard installed, it’s time to make some basic configuration changes to ensure it can connect to our Home Assistant. To start, wait a few minutes after your last reboot and navigate back to the Home Assistant front-end
http://raspberrypi:8123
(note: if after a 5 minute wait, you still can’t connect and/or your touch screen isn’t booting to the desktop, simply unplug and plug back in your pi. There’s a chance it had an issue compiling the new build)
First we need to create a long-lived access token for Tileboard to use. Navigate to your name on the right side

Scroll to the bottom and create a new token. Name it tileboard. Copy it to notepad and leave it on your clipboard for the next step.
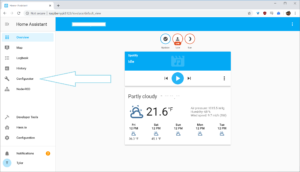
Navigate to Configurator on the left.
This is now a full text editor for your Home Assistant. You will need this to expand upon your configuration.yaml file, as most devices and automations are added this way.
Click the folder in the top left to open your folder structure
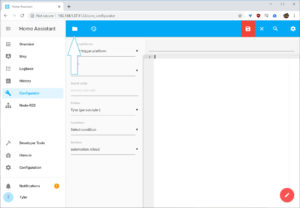
If you want to poke around, you can see your configuration.yaml, which is the core of Home Assistant. You can also see automations and various other files that you will learn as you dig deeper.
For now, scroll down to “www” and open that, then open your new “tileboard” and click on “config.js”.

This will open the configuration file for tileboard. You can click outside of the directory to close it and see the config file.
We are going to make some small changes to get it connected to our Home Assistant. Later on we’ll adjust the actual buttons, but for now we’ll just do basic config settings.
Start by adding your Auth Token from before. Replace
authToken: null, // optional long-lived token (CAUTION: only if TileBoard is not exposed to the internet)
with
authToken: "YOUR_TOKEN",
DON’T FORGET THE COMMA
Next we’re going to adjust the visuals to fit our 7in touch panel. This includes entitySize, tileSize, and scaling down our header.
First, sizes. Replace:
entitySize: ENTITY_SIZES.NORMAL, //SMALL, BIG are available
tileSize: 150,
with
entitySize: ENTITY_SIZES.SMALL, //SMALL, BIG are available
tileSize: 70,
Next, scale down the header. We do this by changing the padding (space around the text). Here is the header by default
header: { // https://github.com/resoai/TileBoard/wiki/Header-configuration
      styles: {
         padding: '30px 130px 0',
         fontSize: '28px'
      },
      right: [],
      left: [
         {
            type: HEADER_ITEMS.DATETIME,
            dateFormat: 'EEEE, LLLL dd', //https://docs.angularjs.org/api/ng/filter/date
         }
      ]
   },
The only thing we need to edit is the padding, so update the padding setting to
padding: '5px 15px 10px',
You can also add a screensaver by uncommenting it out. You do this by deleting the “/*” in
/*screensaver: {// optional. https://github.com/resoai/TileBoard/wiki/Screensaver-configuration
and the “*/” at the end of the block:
},/*
Once you delete these, the color will change from the block to show that it is enabled. The resulting block should look like this:
screensaver: {// optional. https://github.com/resoai/TileBoard/wiki/Screensaver-configuration
      timeout: 300, // after 5 mins of inactive
      slidesTimeout: 10, // 10s for one slide
      styles: { fontSize: '40px' },
      leftBottom: [{ type: SCREENSAVER_ITEMS.DATETIME }], // put datetime to the left-bottom of screensaver
      slides: [
         { bg: 'images/bg1.jpeg' },
         {
            bg: 'images/bg2.png',
            rightTop: [ // put text to the 2nd slide
               {
                  type: SCREENSAVER_ITEMS.CUSTOM_HTML,
                  html: 'Welcome to the TileBoard',
                  styles: { fontSize: '40px' }
               }
            ]
         },
         { bg: 'images/bg3.jpg' }
      ]
   },
Hit the SAVE button on the top right.
Your base configuration is done! You won’t be able to control anything quite yet, but you can now test your panel. If you take a look through some of the settings, you’ll see some changes you may want to make like the theme and timeFormat. I used Transparent for my theme.
Now that you’ve told Tileboard where to look, you can test it out by visiting it from the same computer you were using to configure it. Create a new tab and visit
http://raspberrypi:8123/local/tileboard/index.html
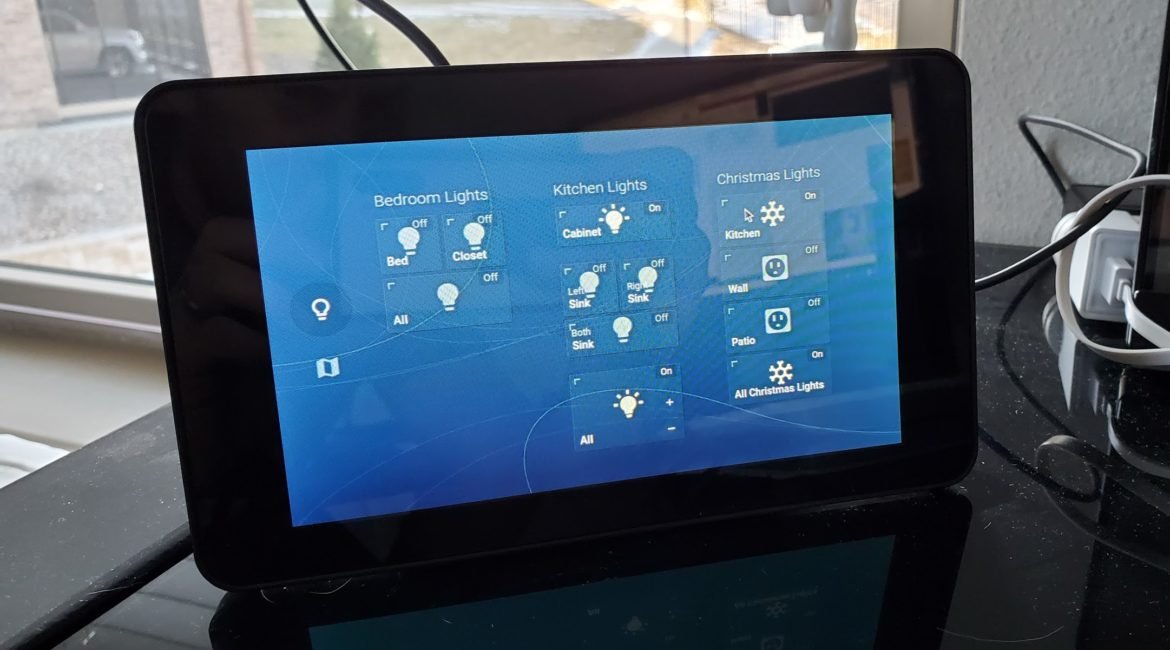
You should see your new touch panel!

It’s going to look funny, but that’s okay. Now we know it works! Don’t worry about the updater error, we’ll be removing that section later on. You’ll be able to use this to preview your touchpanel without having to actually restart it.
Using your touchpanel, open a browser and test the link. Also, test the following link to ensure it is running locally:
http://localhost:8123/local/tileboard/index.html
This is the link we will be using on the touchpanel to ensure local stability.
At this point in the game, we are assuming that you are using Hue smart bulbs or WeMo smart switches. These will be the easiest to implement because I will be telling you how to create them specifically.
We’re going to start with a Hue Lightbulb. The first thing you need to do is determine what Home Assistant recognized your lightbulb as.
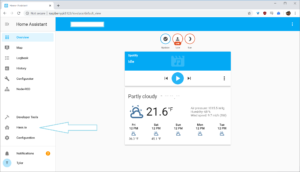
To do this, log in to Home Assistant, click Configuration on the left side, and select Devices.

From here, you will see all of the devices that Home Assistant has integrated with. Find the light or area you want to start with, and click on it. You will get the details for this particular light or area.
You will also see options for autmations, but we are not working on those today. What we want is the name of the light.

You can copy it easily by clicking the little gear to the right and selecting it from the pop up.
If you want, you can also test out the control of your lights now by clicking the lightbulb icon and flipping the switch on and off on the next screen.

Copy this light ID (light.cabinet or similar). You will need it for the next step.
Rafal has built an entire library of tiles for his Tileboard platform. It is quite remarkable, and I have no doubt that if you’ve made it this far, you will continue to learn what it can do. What we will be working with is the Light tile.
{
   position: [0, 2],
   width: 2,
   height: 2,
   title: 'Floor lamp',
   subtitle: 'Lounge',
   id: 'light.lounge_floor_lamp',
   type: TYPES.LIGHT,
   states: {
      on: "On",
      off: "Off"
   },
   icons: {
      on: "mdi-lightbulb-on",
      off: "mdi-lightbulb",
   },
   sliders: [
      {
         title: 'Brightness',
         field: 'brightness',
         max: 255,
         min: 0,
         step: 5,
         request: {
            type: "call_service",
            domain: "light",
            service: "turn_on",
            field: "brightness"
         }
      },
      {
         title: 'Color temp',
         field: 'color_temp',
         max: 588,
         min: 153,
         step: 15,
         request: {
            type: "call_service",
            domain: "light",
            service: "turn_on",
            field: "color_temp"
         }
      }
   ],
   colorpicker: true
},
The great thing about tileboard is the only part you need to update on this block is the ID, Title, and Subtitle. Once you update these to the ID you got from earlier and the names of your choosing, your block is ready.
Copy this block into your text editor of choice and make the changes. I have reformatted the above block to fit on our panel. You should not need to make anymore changes.
The easiest way to learn how this works is to replace an existing tile with the one you just built. The config can understandably get a bit daunting. I am in the process of building a tool to simplify it, but for now lets go ahead and add our new tile.
Open your config.js file from before and scroll down to the section with your first “Group” of your first “Page”
{
   title: 'First group',
   width: 2,
   height: 3,
   items: [
	  {
		 position: [0, 0],
		 width: 2,
		 type: TYPES.TEXT_LIST,
		 id: {},
		 state: false,
		 list: [
			{
			   title: 'Sun.sun state',
			   icon: 'mdi-weather-sunny',
			   value: '&sun.sun.state'
			},
			{
			   title: 'Custom',
			   icon: 'mdi-clock-outline',
			   value: 'value'
			}
		 ]
	  },
	  {
		 position: [0, 1], // [x, y]
		 width: 1,
		 type: TYPES.SENSOR,
		 id: 'updater.updater',
		 state: '@attributes.release_notes'
	  }
   ]
},
We want to replace the second tile with our new tile. Highlight block from your configuration file, delete it, and replace it with your new light block.

There’s a chance your formatting will be off. It is good practice to maintain indents to help keep track of sections. To fix this, highlight the problem lines and simply hit TAB until they line up with the section above.
You should be all set! Hit the save icon in the top right, wait until it is saved, and navigate back to your test tab:
http://raspberrypi:8123/local/tileboard/index.html
If you already have it open, just refresh the page.
You should now see your new. Go ahead and try it out! Tapping it will toggle the light on/off. Holding it down will bring up color and brightness controls.
Now that you’ve got the basic idea, you can start to tweak it as you like. Add buttons, remove buttons, resize them, go nuts. My only advice would be to make small changes at a time and test them. It can be quite easy to break the system and if you wait too long to test it, you may have a difficult time fixing it. So, baby steps, everyone does it!
Here is the list of supported tiles and examples:
https://github.com/resoai/TileBoard/blob/master/TILE_EXAMPLES.md
Once you’ve got a base setup that you want to push to your touch panel, continue to step 10.
Connect to PuTTY using your initial Raspbian hostname (raspberrypi).
Once connected, edit the autostart file:
sudo nano /etc/xdg/lxsession/LXDE-pi/autostart
You will see the current autostart settings
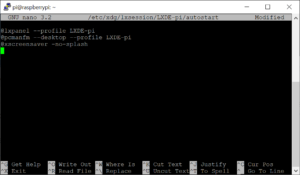
Add the following to this file:
@xset s 0 0
@xset s noblank
@xset s noexpose
@xset dpms 0 0 0
@chromium-browser --noerrdialogs --incognito --kiosk http://localhost:8123/local/wall_panel.html
That’s it! We’re done with the base configuration! Hit ctrl-o to overwrite the file and ctrl-x to exit. Just reboot the system and watch the magic happen:
sudo nano reboot
[…] automation lighting control, personal scheduling, and even Spotify music control. Danielson has a blog post explaining how he accomplished a lot of that, so be sure to give it a read if you want to build […]
Why not a cheaper tablet like Fire 7″?
You absolutely could use a Fire 7. I actually use one on my desk. You would still need the Raspberry Pi to run Home Assistant (unless you set it up using one of their alternative methods, like a VM).
The purpose of this tutorial was to create an all in one setup, in case you didn’t want separate components.
are all the expandable links broken?
It appears that my dropdown plugin keeps breaking on me, which is really frustrating. I’m currently rolling back the plugin now which should help.