This page is under construction
Sign up for our mailing list to be notified when it is completed
Getting Started
This guide is designed to expand upon an already existing Home Assistant installation. I am also going to assume you have a decent understanding of Lovelace and it’s configuration.
The first thing you need to do is download the necessary software to build your 3D view. You will need:
- Sweet Home 3D (sweethome3d.com)
- GIMP (gimp.org)
Both of these are free.
Part 1 - Build your home in Sweet Home 3D
This step will be easiest to do if you can track down a copy of your floorplan. If not, fret not, you can still build your home, it just won’t be as easy as tracing a floorplan.
(Optional) - Import your floor plan

This step will be easiest to do if you can track down a copy of your floorplan. If not, fret not, you can still build your home, it just won’t be as easy as tracing a floorplan.
To do this, you first need to have an image file of your floorplan. For me, I went to the website for my apartment complex and saved the floorplan they had advertised. You can also use the Snipping Tool built into windows to save a screenshot of the floorplan.
Step 0: Launch Sweet Home 3D
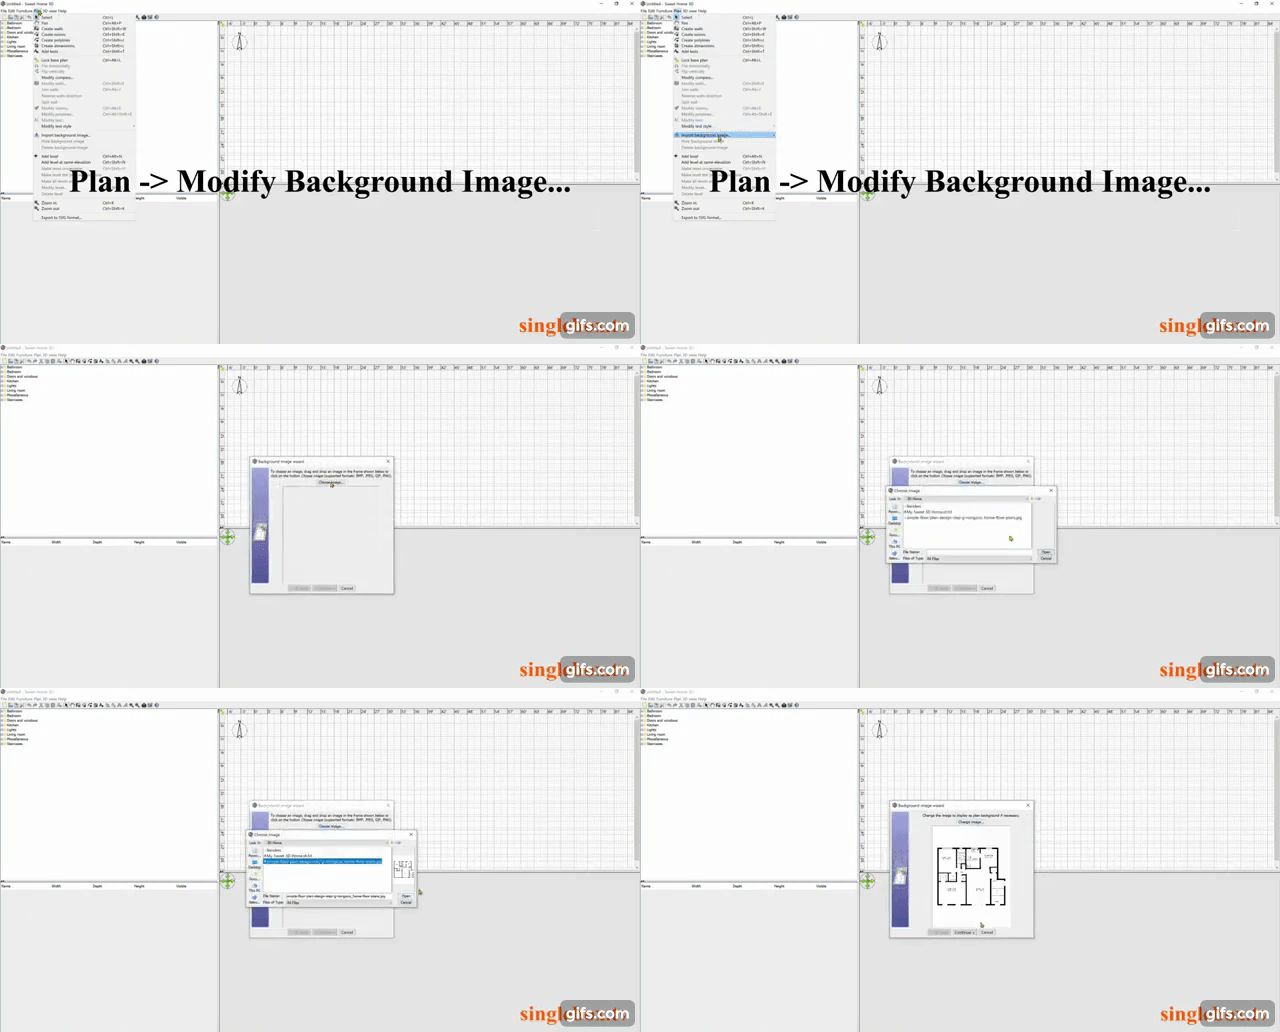
Step 1: Go to Plan -> Import Background Image…
Step 2: Select floorplan
Step 3: Hit Continue

Step 4: Find a dimension that you know and align the blue bar with that section
Step 5: Fill known dimension in the Length of drawn line input. You can use inches or feet/inches (e.g. 121″ or 10’1″ )
Step 6: Continue
Step 7: Determine where you want drawing to start. I typically use the bottom left corner, though I have not found any reason to change this.
Step 8: Click Finish
Your floorplan is now imported at scale to start building. I recommend saving your file now.
Building Walls
Now for the fun part, building your home.
Step 1: Click Create Walls
Step 2: Start by building the exterior. Choose a corner to start and trace your floorplan (if you imported one) around the outside. You’ll notice as you start to build that blue guideline appear so that your wall lines up with another, use these as much as you can.
Step 3: Once your exterior is completed, hit Esc and start building the interior.
Note: You may need to play around and see how these build nicest. Every floorplan is different and you may need to try multiple times to get it right. Simply ctrl+z to undo and recreate it how you like. You can also adjust walls by clicking an end and dragging it. Sweet Home 3D has a ton of capabilities that I can’t even begin to cover. Have fun with it!
Step 4: once you have all of your interior and exterior walls completed, save. In fact save as often as you like, better safe than sorry.
Adding Doors
Once your walls are completed, it’s time to start adding doors. Sweethome3D has a variety of styles of doors. They are all adjustable in height, width, and opening. I will get you started and you can play around to build as you’d like.
Step 1: On the left side panel, find the category Doors and Windows and expand it
Step 2: Find the door you want to use. You can hover over each to see what they look like
Step 3: Drag your desired style to the wall you want to place it and drop it.
Step 4: If needed, adjust the width of your door by double clicking on it and changing the “Size -> Width”
Step 5: Add the rest of your doors. You can do this by dragging more from the furniture panel or holding select on an existing door and dragging that as well.
Notes about Doors
- One of the handles on a door allows you to drag for the width. You can use this for quick updating
- Not all doors look the same. In the Modify Furniture dialog, you can adjust height, width, and color
- Another option you can adjust is opening amount.
- I use doors frames to easily add an opening in a wall
Adding Windows
Once you’ve added your doors, it’s time to add your windows. These follow a similar process as doors, by dragging and dropping the style you want into the wall.
Step 1: On the left side panel, find the category Doors and Windows and expand it
Step 2: Find the window you want to use. You can hover over each to see what they look like
Step 3: Drag your desired style to the wall you want to place it and drop it.
Step 4a: Double click the window and adjust the elevation, height, and width as desired.
Step 4b: Alternatively, the window will have handles around it that serve different dimension. Play around by dragging them to adjust height, elevation, and width. If you don’t like how it looks, simply ctrl+z to undo and try again.
Step 5: Continue adding windows as needed. I find it easiest to hold ctrl and dragging windows I have created so that they keep the same dimensions.
Step 6: Save
Notes about Windows
- Similar to doors, you can adjust a variety of settings on your windows. Play around to adjust them as you like
- Unlike doors, windows come in far more shapes and sizes. With some tweaking you should be able to create windows that at least resemble your style.
- If not, SweetHome3d has a ton of downloadable styles on their website that you can download and import. This tutorial does not get into how to do this
Creating Rooms
Defining rooms in SH3D is not required, but helps to add flooring and easily paint walls.
Step 1: Click Create Room in your toolbar
Step 2: Click on one corner of the room you want to define
Step 3: Continue to click in each corner of the room until you have highlighted the entire room
Step 4: Hit Escape to finish selection and give your room a name
Step 5: Continue Steps 1-4 for each room you want to define/edit
Modifying Rooms
Once you’ve defined your room, you can begin to edit them to look more like your real-life home.
Step 1: Right click on your room and click Modify Room
Step 2: Choose the color/style you want for your floor. I had to play around to find the look I wanted. You can choose tiles or solid colors. You can also import tiles if you want.
Step 3: Paint your walls by right clicking them and selecting Modify Wall. From here, select your left/right colors for the wall. Again, play around with this to find the style you want.
Step 4: Continue with each room as you want to adjust and save as you go along.
Note: I don’t go into great detail here. Each home will be different and there are a lot of tools. SH3D can do as little or as much as you want to do, go crazy.
Part 2 - Add Lighting and Export Renders
It’s now time to start giving your home some life. This step is the reason you’re here in the first place; lighting. The next steps are simple, but crucial towards building your home. i will try my best to break them down as much as possible. If I miss anything, please leave a comment below or use the chat in the bottom right corner.
If you’ve made it this far, I’m assuming you have built your home in Sweet Home 3D. If you have, load it up and continue. If not, please go back to Part 1 and get started.
Add Lights
Step 1: ON the left side panel, find the category Lights and expand it
Step 2: Drag the White Light Source into the center of a room
Note: I use White Light Source because it is the easiest to adjust and I am hoping to apply filters in the future to add colors. If you want more of a yellow and/or natural lighting, feel free to add Halogen or Incandescent, just know that it might be more difficult to update later.
Step 3: Add a light to each room by simply dragging and dropping a new one
Step 4: After you have added a light to each room (or as you’re adding them), find them in the left side resource view and rename them to their respective room. Example: Rename White Light Source 1 to Light – Living Room. This will make future steps a lot easier.
Test Lighting
Before we start exporting high resolution layers, it is best to test how each room looks and make adjustments.
Step 1: Click on the little camera icon to create a picture
Step 2: Adjust Quality to the setting just before Best. This will add lighting to the scenes
Step 3: Click Create
You should now see what your floorplan looks like with all of the lights enabled. Adjust you camera angle, Time of day, and lights until they look how you want in your final export.


For even better results, I would recommend stacking the pictures in photoshop/gimp and selecting the difference in the 2. It’s a little bit more difficult, but it will give much better results because the light is transparent so when lights stack it will make that area brighter instead of just showing the brightness of whatever the highest card in the stack is.
Beautiful Work….Tnks
Thanks for the awesome tutorial! This guide has been super helpful in setting up my own floorplan in Home Assistant. I faced some friction at the step where we needed to extract only the details of open lights from the base image. I read the comment of Adam above and found something even more intuitive and time saving – Resemble.js (https://rsmbl.github.io/Resemble.js/)
I’m putting up the short instructions via an Imgur image – https://i.imgur.com/gIWmNvP.png
I hope this will help anyone who is facing any challenge at that step.
I don’t know how I’m just seeing your post, but this is awesome! Thanks for the tip, I wonder if I can find a way to help streamline the process.
Hello, it’s possible to show sensors values at any room or add button to turn on/off TV for example? How i can do it? thanks